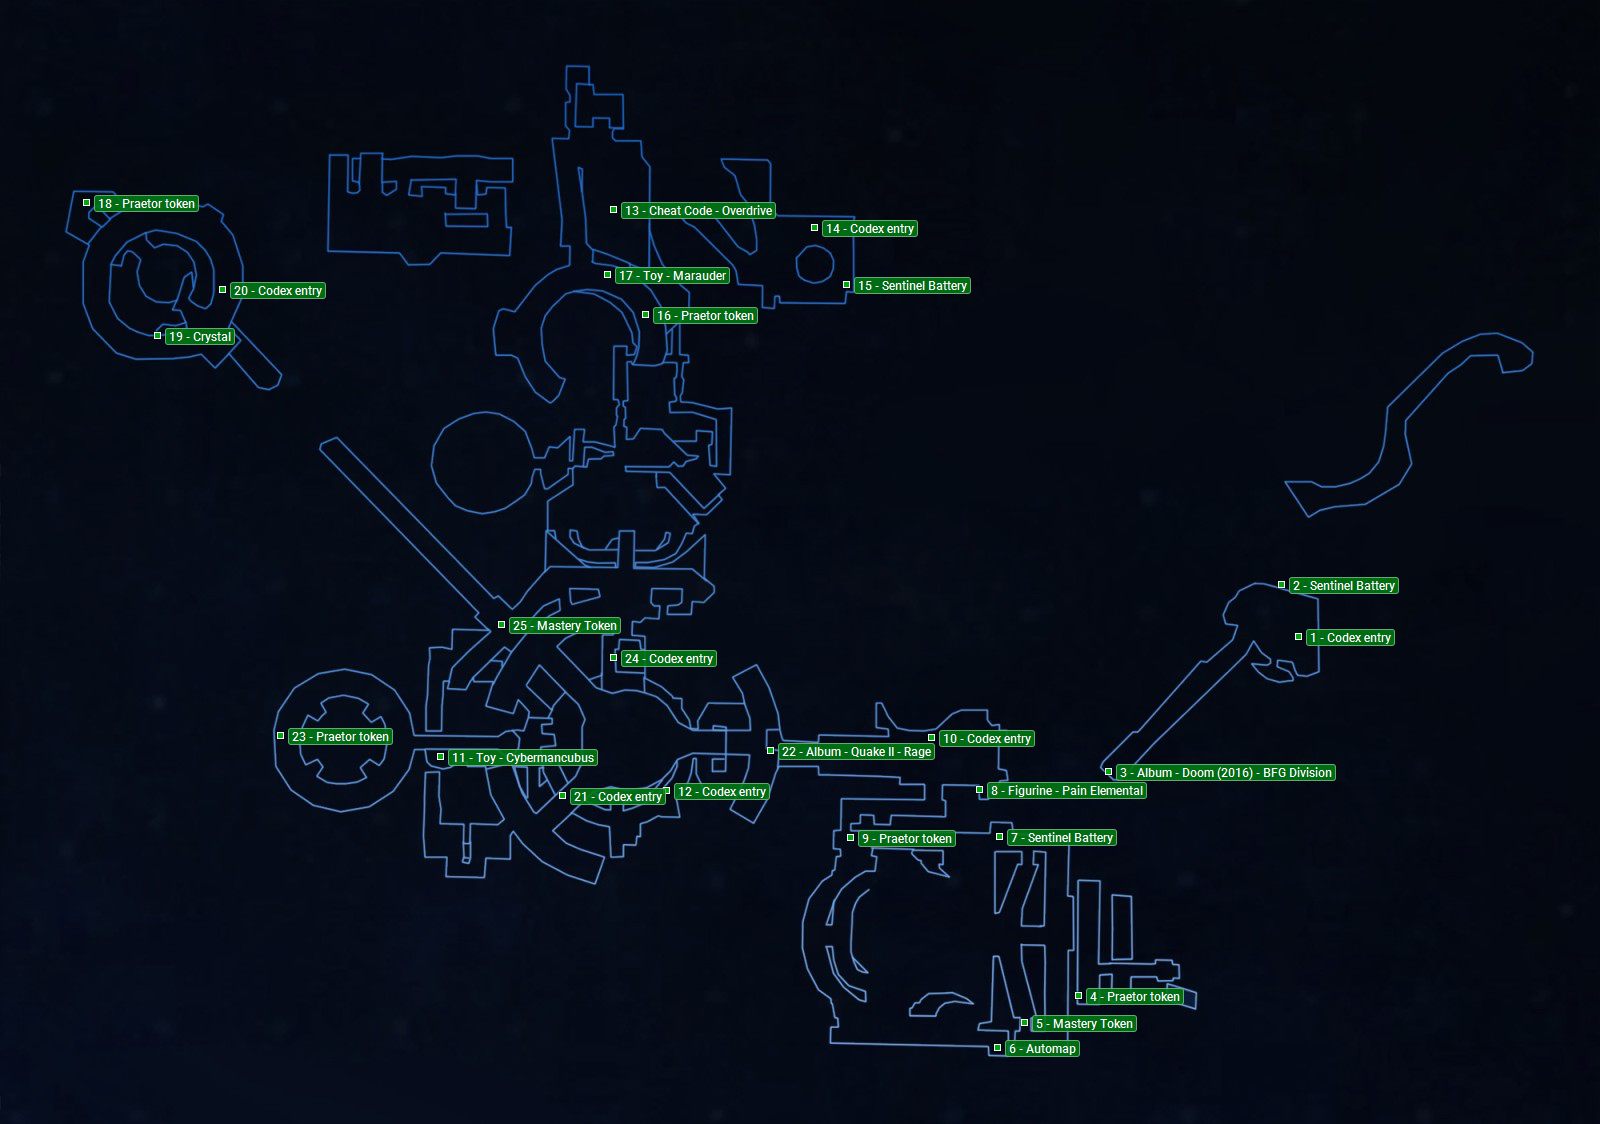
Remember, if you missed something, you’re free to return to this mission at any time.
However, it’s crucial that you complete it so that save all collectibles/secrets.
This chapter describes only locations and ways of getting the collectibles.
Mission walkthroughs are in aseparate chapter of this guide!
Taras Nabad
You will find the codex note immediately after starting the mission.
Simply jump on the rocks, and then go to the ruins of the building.

The secret is over the precipice.
Sentinel Battery
After receiving the codex note, jump into the abyss.
Another stone ledge is at the bottom.

Once you are on it, turn around and destroy the cracked wall.
This will help you get to the battery.
Album - Doom (2016) - BFG Division
This album is under the bridge.

To get into this secret, you’re gonna wanna show some dexterity.
Perks
You will get to this place by completing the story task.
This secret is hard to miss.

Mastery Token
Weapon upgrading token is in the arena where you fight with opponents.
The token isn’t blocked in any way.
Automap Station
The map is located directly above the token.
To open up the way to the Sentinel Battery, it’s crucial that you destroy the damaged monument.
It is located on the opposite side of the location.
The button you better press is behind the monument.
The heavy object will make a hole in the wall when falling down.
Use the newly created pathway to reach the battery.
This will get you to the corridor where the codex entry lies.
All you have to do is destroy the damaged wall, and you’ll get into a small cavity.
The secret is inside.
The action might be easier if you use Chrono Strike rune.
Thanks to it, you should land at the cavity without problems.
Perk
To get to this secret, you have to wait for the right moment.
There is a damaged fragment on the wall, but it is almost constantly blocked by bars.
Wait until it’s possible for you to jump safely and get to the secret.
Fuel the Eternal Flame - Part 3
During the mission, you’ll reach a narrow corridor.
The secret is in there.
Figurine - Archvile
When traveling through the ventilation shaft, you have to watch the walls carefully.
About halfway there is a damaged piece that you have to destroy to make it reach the collectible.
This secret is located on the opposite side of the entrance to the location, behind a huge mechanism.
Use the Chrono Strike rune to reach a narrow corridor.
That’s where you’ll find the cheat code.
The perk is hidden in the same area as described above.
Extra Life
Use the launcher to reach onto the nearest platform.
Watch out, there’s a flame trap on this object that’s gonna hurt you.
Avoid the flames by reaching the rim of the object and regenerate your health.

To gain extra health, you must climb to the very top of this burning trap.
You have to be extremely careful to make it not lose your health points.
You will get to this secret by completing the story task.
All you have to do is get out of the reservoir and you will get the secret.
The green button will activate another mechanism.
You must enter the object that has appeared on the map.
This will bring up the grate, and you will get the toy.
The Divinity Machine
You will find this note as soon as you pass through the gate.
Just turn right and you will see the secret.
When the passage opens, go all the way to the end.
After collecting the floppy disk, you will be able to go back using a newly unlocked shortcut.
History of the sentinels - part 11
After leaving the well, turn right.
There you will find a fire note that stands out against the background.
The battery lies next to the previously found note.
Just turn around and you will get it.
When you come out of the well, you will see a huge downed demon.
Jump over it to get to the opposite corner of the location.
The secret is waiting for you there.
Toy - Marauder
This destroyed wall is next to the secret described above.
Break it to get to the figure.
You will get to this secret after fighting opponents.
As soon as you go up, you will see the bluish glow.
Below is a rock shelf, from which you will get to the next room.
It contains two collectibles.
One of them is crystal.
History of the sentinels - part 12
You will also find a note in this place.
It lies on the opposite side.
History of the sentinels - part 13
You will get this secret by following the mission objective.
Just before you grab the object related to the plot, go have to the left.
Album - Quake II - Rage
This album requires dexterity.
You have to fly into the air using the blue jump pads and then smash the wall.
This way, you will open a passage to the secret.
To get to this collectible, you better go around the plot-related object.
History of the sentinels - part 14
You will reach this collectible by following the mission objective.
It isn’t hidden in any way.
The last secret can be found right at the end of the mission.
Extra life
You will find your first extra life right under the machine.
Jump inside and you will get the secret.
You will find another extra life at the top of the building.
You will get there by climbing the stairs.
Collect the extra life.
This site is not associated with and/or endorsed by the Bethesda Softworks or id Software.
All logos and images are copyrighted by their respective owners.